Graphic tutorial: Connect Blender to AI in five steps, and let Claude help you build a 3D scene in just one sentence图文教程:五步把 Blender 接到 AI 上,让 Claude 一句话帮你建 3D 场景
The MCP for Blender plug-in (30,000 stars) added to the library today allows AI to directly operate Blender. This tutorial uses five steps to complete "Install uv → Configure MCP client → Install and enable the Blender plug-in → Test the connection → Let AI build the first scene". It is universal for Windows / macOS and comes with an offline installation plan for the download package from this site.
今天入库的 MCP for Blender 插件(3 万 Star)能让 AI 直接操作 Blender。本教程用五个步骤完成「装 uv → 配 MCP 客户端 → 装并启用 Blender 插件 → 测试连接 → 让 AI 建第一个场景」,Windows / macOS 通用,并附本站下载包的离线安装方案。
Step one: Install UV (key prerequisite)第一步:装好 uv(关键前提)
uv is Python's package and virtual environment manager, and the MCP server of this plug-in is started by it. Windows uses PowerShell to execute powershell -c "irm https://astral.sh/uv/install.ps1 | iex", macOS uses brew install uv directly, and Linux uses the official installation script.
Be sure to use the official installer, do not use pip install uv; after installation, enter uvx --version in the terminal. If the version number is displayed, it means it is ready.
uv 是 Python 的包与虚拟环境管理器,这个插件的 MCP 服务端靠它启动。Windows 用 PowerShell 执行 powershell -c "irm https://astral.sh/uv/install.ps1 | iex",macOS 直接 brew install uv,Linux 用官方安装脚本。
务必用官方安装器,不要用 pip install uv;装完在终端输入 uvx --version 能出版本号就说明就绪。
Step 2: Add the MCP server to your AI client第二步:把 MCP 服务端加进你的 AI 客户端
Claude Code Just one command: claude mcp add blender uvx mcp-for-blender; Codex uses codex mcp add blender -- uvx mcp-for-blender.
Claude Desktop Go to "Settings → Developer → Edit Configuration" and add {"blender":{"command":"uvx","args":["mcp-for-blender"]}} to mcpServers; Cursor on Windows needs to be written as {"command":"cmd","args":["/c","uvx","mcp-for-blender"]}.
Only one MCP instance configured in the client is retained at the same time to prevent two clients from competing for the same server.
Claude Code 一条命令即可:claude mcp add blender uvx mcp-for-blender;Codex 用 codex mcp add blender -- uvx mcp-for-blender。
Claude Desktop 走「设置 → 开发者 → 编辑配置」,在 mcpServers 里加 {"blender":{"command":"uvx","args":["mcp-for-blender"]}};Windows 上的 Cursor 需要写成 {"command":"cmd","args":["/c","uvx","mcp-for-blender"]}。
同一时间只保留一个客户端里配置的 MCP 实例,避免两个客户端抢同一个服务端。
Step 3: Install and enable the Blender plugin第三步:安装并启用 Blender 插件
Execute uvx mcp-for-blender install-addon on the command line, it will copy the add-on to Blender's addons directory and print the path, while leaving a .bak backup of the overwritten file.
Open Blender → Edit → Preferences → Plugins, search for "MCP for Blender", and check Interface: MCP for Blender to enable it. If you can't find it in the list, click "Install..." to select the copied blender_mcp.py or addon.py and then enable it.
命令行执行 uvx mcp-for-blender install-addon,它会把插件复制到 Blender 的 addons 目录并打印路径,同时给被覆盖的文件留一份 .bak 备份。
打开 Blender → 编辑 → 偏好设置 → 插件,搜索「MCP for Blender」,勾选 Interface: MCP for Blender 启用。若列表里找不到,就先点「安装…」选中复制出来的 blender_mcp.py 或 addon.py 再启用。
Step 4: Start the connection and perform self-test第四步:启动连接并自检
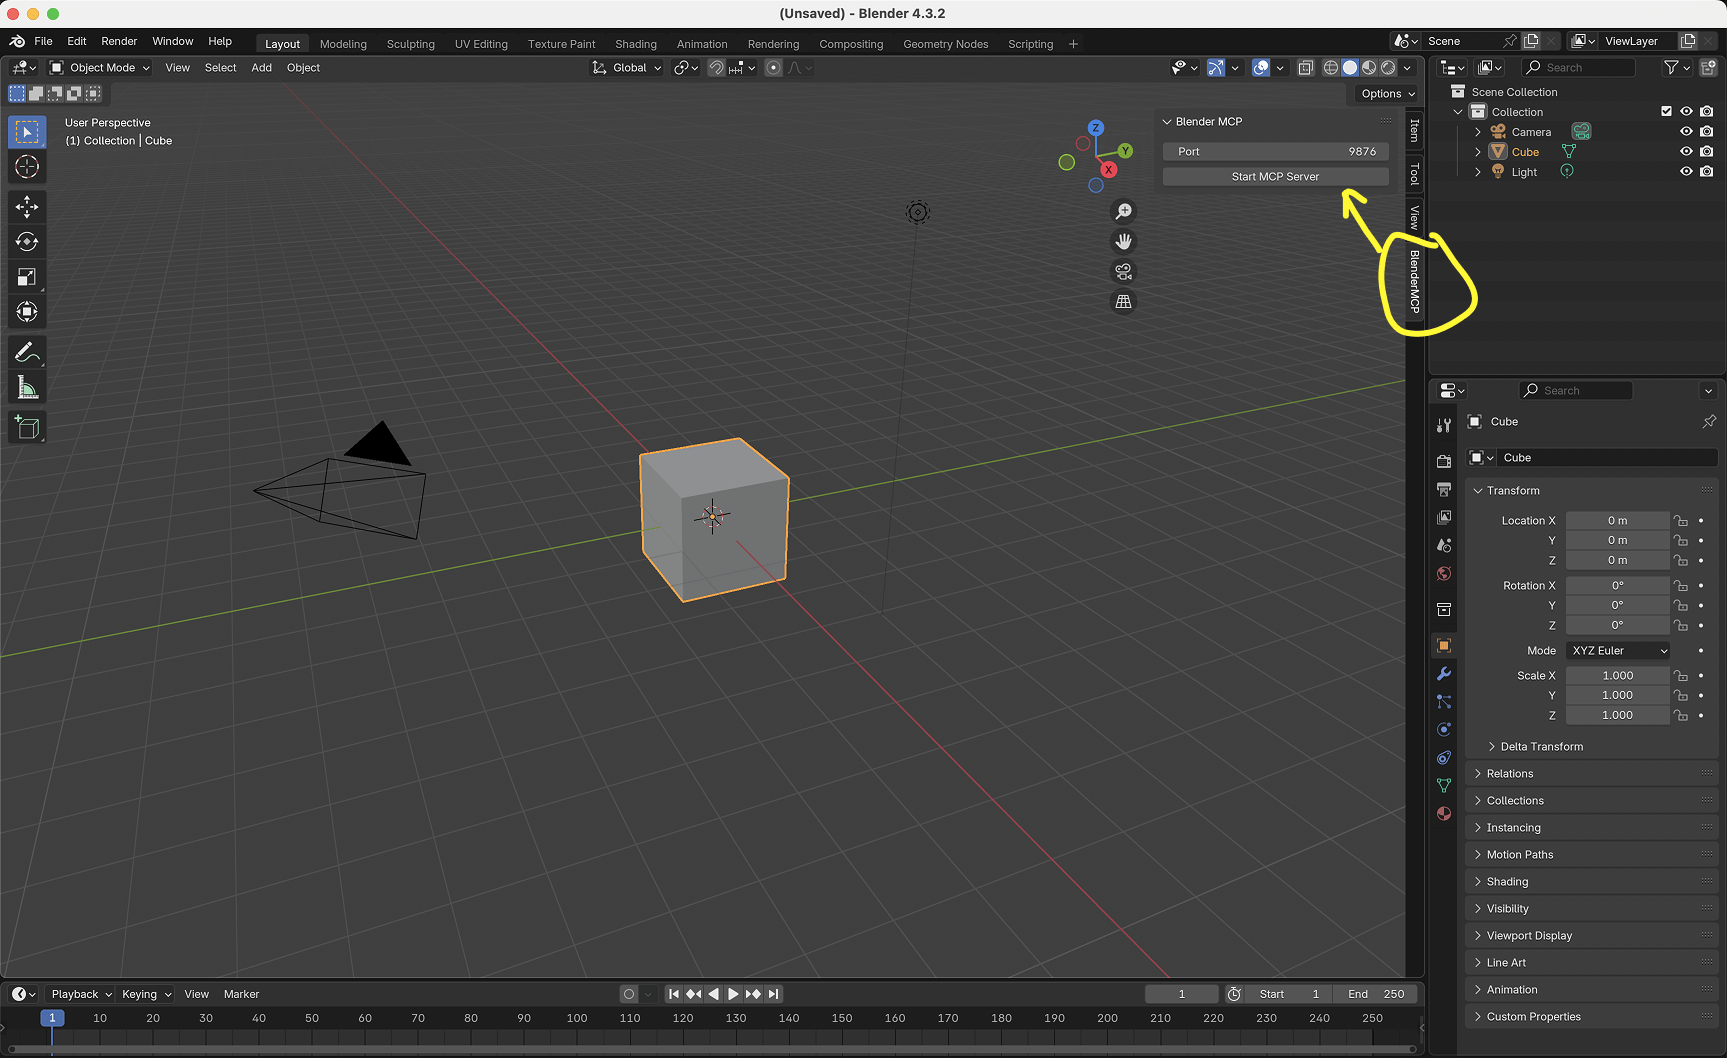
Press N in the 3D view to open the sidebar, switch to the MCP for Blender tab, and click Start MCP Server; the plug-in will automatically start the service when Blender starts. You only need to confirm it manually here.
Completely exit and reopen your AI client (for Windows, remember to exit from the system tray) and let it reload the MCP configuration - if you don't do this step, the client will often not be able to read the newly added server.
在 3D 视图里按 N 打开侧边栏,切到 MCP for Blender 标签页,点 Start MCP Server;插件会随 Blender 启动自动起服务,这里只是手动确认一次。
完全退出并重开你的 AI 客户端(Windows 记得从系统托盘退出),让它重新加载 MCP 配置——这一步不做,客户端常常读不到新加的 server。
Step 5: Let AI build the first scene第五步:让 AI 建第一个场景
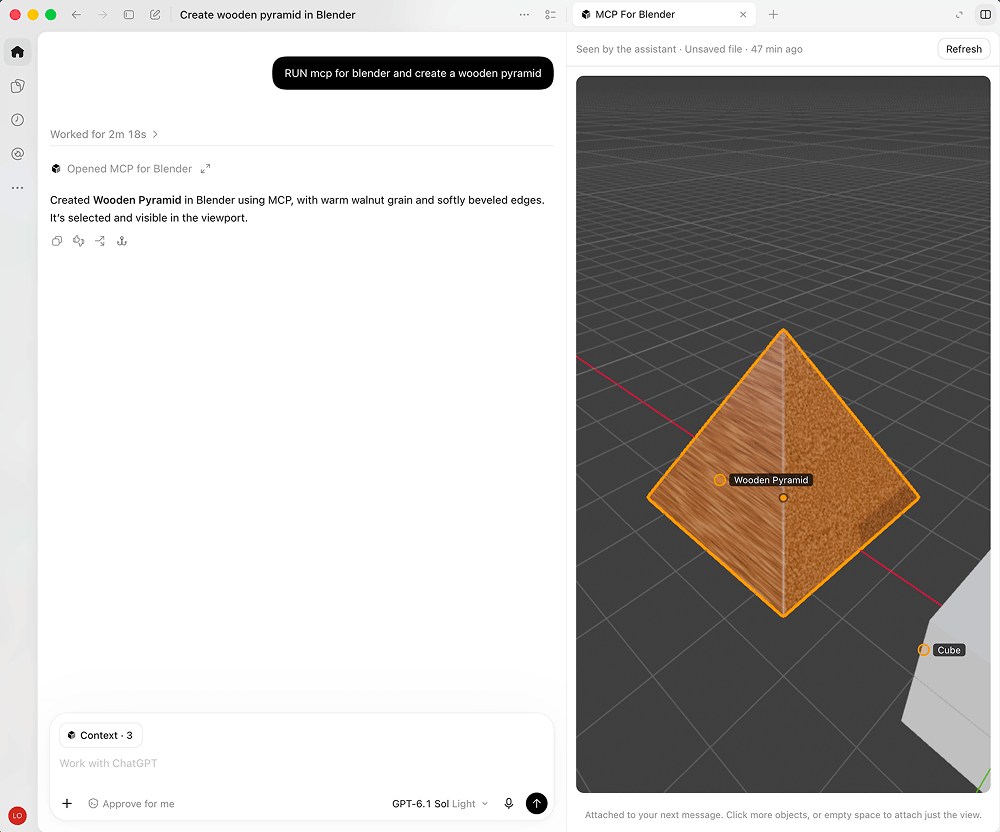
In the dialog box, describe the scene you want in Chinese, such as "Build a low-polygon dungeon, with a dragon guarding the treasure chest" and "Use Poly Haven's cloudy HDRI to light the scene, and replace the walls with rusty metal materials." AI will adjust its own instructions for modeling, materials, lighting, and camera placement.
It will also send back multi-angle screenshots and rendering results for self-verification; if the effect is wrong, just say "change the camera to an isometric perspective" or "change the car paint to red metal" and continue iterating.
在对话框里用中文描述你要的场景,比如「建一个低多边形地下城,有条龙守着宝箱」「用 Poly Haven 的阴天 HDRI 给场景打光,墙面换成锈迹金属材质」。AI 会自己调指令建模、套材质、布光、摆相机。
它还会回传多角度截图和渲染结果自我核验;如果效果不对,直接说「相机改成等距视角」「车漆改成红色金属」继续迭代即可。
FAQ常见问题
Can't connect? First confirm that Blender is open, the plug-in is enabled, and the server is running, and then check whether the client is configured with only one instance; be sure to completely restart the client after changing the MCP configuration.
Offline installation: The "AI Plug-in" column of this site provides a complete source code package. After unzipping, click "Install..." in Blender and select addon.py. There is no need to connect to the Internet to pull the server. This article is compiled from public information, and the resources are only for learning and exchange.
连不上?先确认 Blender 已打开、插件已启用、服务端在运行,再检查客户端是否只配了一个实例;改完 MCP 配置一定要完全重启客户端。
离线安装:本站「AI插件」栏目提供完整源码包,解压后在 Blender 里点「安装…」选择 addon.py 即可,无需联网拉取服务端。本文整理自公开资料,资源仅供学习交流。
本篇为图文教程,直接按步骤操作即可,无需下载文件。
阅读与点赞数据保存在你的浏览器本地,欢迎留下你的想法。
 今日正能量学一点,用一点;今天种下的种子,会长成明天的能力。去免费下载专区 →广告
评论 文明发言,让讨论更有价值