Tutorial: Four steps to build an agent sandbox with strategy教程:四步给智能体建一个带策略的沙箱
4-Step Running Pass: Confirm the platform, install the CLI and local gateway, build the first sandbox, run a real agent with OpenCode, and experience the process of "approving new permissions". Works with today's NVIDIA OpenShell clients.
四步跑通:确认平台、一行装好 CLI 与本地网关、建第一个沙箱、再用 OpenCode 跑一个真实智能体并体验「批准新权限」的流程。配合今天的 NVIDIA OpenShell 客户端使用。
Step 1: Make sure your platform can run第一步:先确认你的平台能不能跑
Official support for Linux, Apple Silicon's macOS, and Windows + WSL 2 (labelled experimental). It also requires one of Docker, Podman, or host virtualization - because the sandbox itself depends on these for isolation.
Note for Windows users: This is not a native Windows tool and must be operated in WSL 2. Run wsl --version to confirm the WSL version, and then confirm whether the WSL integration of Docker Desktop is turned on.
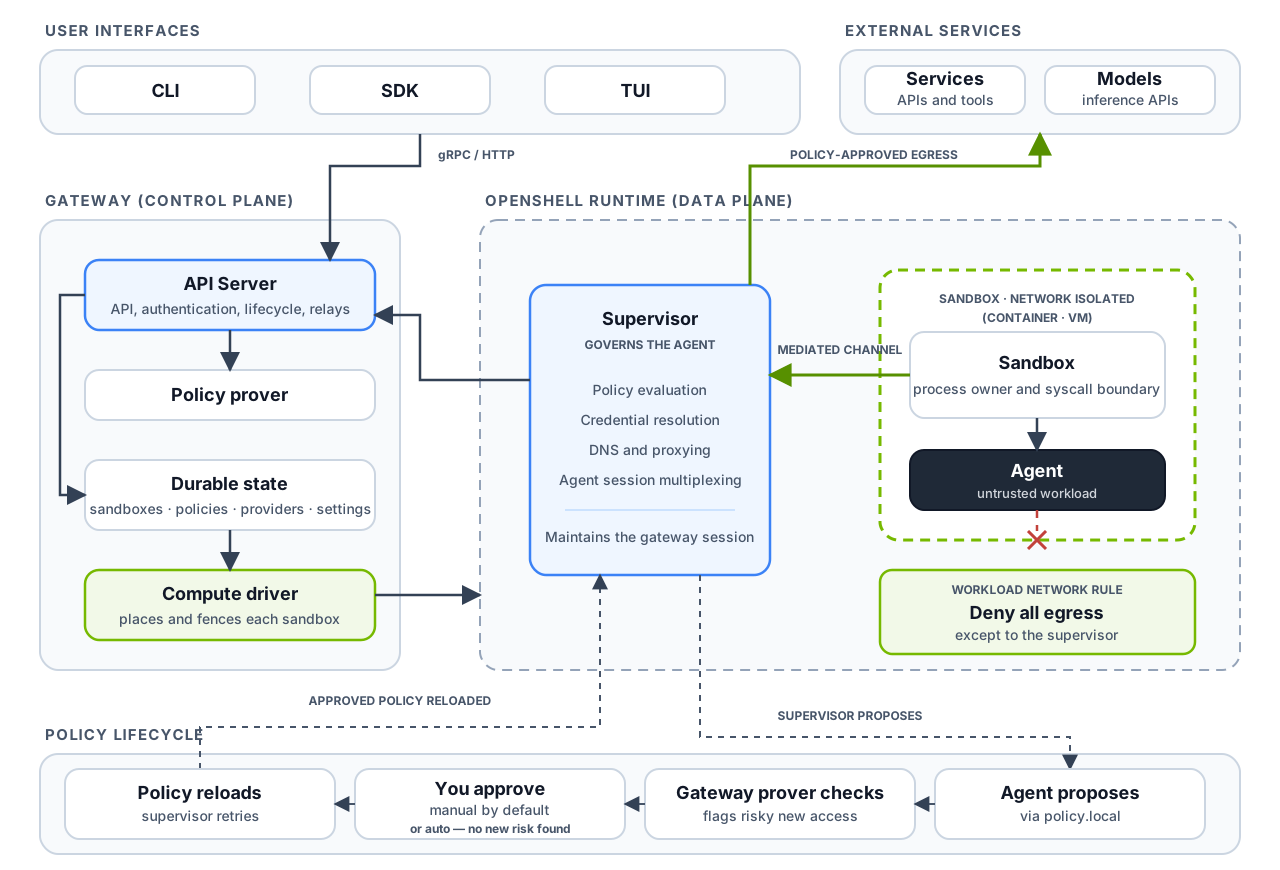
The diagram is the system architecture diagram in the official warehouse: the user interface is connected to the gateway, and the gateway uses the prover for policy verification; the supervisor and the sandbox load are separated at runtime, and the only external channel of the load is the intermediated connection. If you read this picture, all the concepts behind it will go smoothly.
官方支持 Linux、Apple Silicon 的 macOS,以及 Windows + WSL 2(标注为实验性)。此外还需要 Docker、Podman 或主机虚拟化其中之一——因为沙箱本身要靠这些来隔离。
Windows 用户请特别注意:这不是原生 Windows 工具,必须在 WSL 2 里操作。先跑 wsl --version 确认 WSL 版本,再确认 Docker Desktop 的 WSL 集成是否打开。
配图是官方仓库里的系统架构图:用户界面接网关,网关用 prover 做策略验证;运行时把 supervisor 和沙箱负载分开放置,负载唯一的对外通路是那条被中介的连接。看懂这张图,后面所有概念都会顺。
Step 2: One line with CLI and local gateway installed第二步:一行装好 CLI 和本地网关
Official installation script: curl -LsSf https://raw.githubusercontent.com/NVIDIA/OpenShell/main/install.sh | sh. Once installed, it will be ready with both a command-line client and a local gateway - the gateway is the control plane for sandboxing, policies, and access, without which it won't be able to run.
If the network environment is inconvenient to use this script, the Linux x86_64 static client provided in this website can also be used directly: after decompression, a single file executable program openshell (about 9.96 MB) can be thrown into path. However, note that this package is only a CLI, and the gateway still needs to be deployed separately according to the official documentation.
Run the openshell -help make sure it works, then build the sandbox.
官方安装脚本:curl -LsSf https://raw.githubusercontent.com/NVIDIA/OpenShell/main/install.sh | sh。装完它会同时准备好命令行客户端和一个本地网关——网关是沙箱、策略和访问的控制面,少了它什么也跑不起来。
如果网络环境不方便走这条脚本,本站提供的 Linux x86_64 静态客户端也可以直接用:解压后是一个单文件可执行程序 openshell(约 9.96MB),丢进 PATH 即可。但注意这个包只是 CLI,网关仍需按官方文档单独部署。
装完跑一下 openshell --help 确认能执行,再去建沙箱。
Step 3: Build your first sandbox第三步:建第一个沙箱
Execute openshell sandbox create --name demo. The default image is minimalist Ubuntu, which does not contain any agents - this is a deliberate design: build the empty room first, and then decide who can enter and what can be touched.
Once the sandbox is built, you can start by observing. The core ability of OpenShell is "policy", which governs three types of rules: which paths can be read and written by the file system, which hosts can be connected to the network, and what processes can do. These rules are not self-consciously obeyed by the agent, but are enforced at the kernel level - every file access, every system call, every external connection is checked at runtime.
Another key design is credential: the agent never sees the real key. OpenShell only injects credentials on requests to approved endpoints, so even if an agent is prompted to inject, it doesn't have a key to take with it.
执行 openshell sandbox create --name demo。默认镜像是极简 Ubuntu,里面没有装任何智能体——这是刻意的设计:先把空房间建好,再决定让谁进去、能碰什么。
沙箱建好之后,你可以先从观察开始。OpenShell 的核心能力是「策略」,它管三类规则:文件系统能读写哪些路径、网络能连哪些主机、进程能做什么。这些规则不是靠智能体自觉遵守,而是内核级强制——每一次文件访问、每一次系统调用、每一条对外连接都在运行时被检查。
另一个关键设计是凭据:智能体始终看不到真实密钥。OpenShell 只在发往已批准端点的请求上把凭据加注进去,所以哪怕智能体被提示注入攻破,它手里也没有可以直接带走的钥匙。
Step 4: Run a real-life agent and experience “Approve new permissions”第四步:跑一个真实智能体,体验「批准新权限」
Use OpenCode with a free OpenRouter model to run according to the “Run Your First Agent” section of the official documentation. The point of this step is not the agent itself, but to see what happens when it needs new permissions.
By default, the agent wants to access a new host or call a new API method, and the request stops and waits for approval. You can use the advisor to see the suggestions and the prover to see the results of the formal verification - it will clearly tell you what access rights will be newly granted for this policy change, such as "Can access a new host with credentials". These changes deserve a look before they're released.
This Validate and Reactivate process is the most valuable part of it. It changes permission management from “looking at logs in hindsight” to “knowing beforehand what will happen.”
If you want to save time, you can also let the agent learn this tool yourself: npx skills add NVIDIA/OpenShell will equip your programming agent with the skills to drive the OpenShell CLI, write sandbox strategies, troubleshoot gateways and inference routing, without additional clone source code.
Lastly, telemetry: OpenShell collects anonymous action categories and counts by default, without sandbox names, host names, file paths, prompts, credentials, or model names. To turn off, set open shell_telemetry_enabled = false on the gateway.
按官方文档的「Run Your First Agent」章节,用 OpenCode 配一个免费的 OpenRouter 模型跑起来。这一步的重点不是智能体本身,而是观察它需要新权限时会发生什么。
默认情况下,智能体想去访问一个新主机、或者调用一个新的 API 方法,请求会停下来等人批准。这时你可以用 advisor 看建议、用 prover 看形式化验证的结果——它会明确告诉你这次策略变更将新开出哪些访问权限,比如「能带凭据访问某个新主机」。这类变更值得人看一眼再放行。
这个「先验证、再生效」的流程是它最有价值的部分。它把权限管理从「事后看日志」变成「事前知道会发生什么」。
想省事的话,还可以让智能体自己学会这套工具:npx skills add NVIDIA/OpenShell 会给你的编程智能体装上驱动 OpenShell CLI、编写沙箱策略、排查网关与推理路由的技能,不需要额外 clone 源码。
最后提一句遥测:OpenShell 默认收集匿名操作类别和计数,不含沙箱名、主机名、文件路径、提示词、凭据或模型名。要关闭就在网关上设 OPENSHELL_TELEMETRY_ENABLED=false。
Notes使用提醒
This article is compiled from public sources and ships with the matching resource. Product features and pricing are subject to the official page. Resources are for learning and exchange only — please respect the original license.
本文整理自公开资料并附上配套资源;涉及产品的功能与价格以官方页面为准。资源仅供学习交流,请遵循来源许可。
⬇ Download · 点击下载:OpenShell v0.1.2 官方 Linux x86_64 客户端(教程配套)(约 10.20 MB)
配合本教程使用,解压得单文件可执行程序 openshell;网关等组件请从官方 Release 获取
阅读与点赞数据保存在你的浏览器本地,欢迎留下你的想法。
 今日正能量学一点,用一点;今天种下的种子,会长成明天的能力。去免费下载专区 →广告
评论 文明发言,让讨论更有价值