Graphic tutorial: Driving development with Spec Kit specifications, from specifying init to generating implementation图文教程:用 Spec Kit 跑通规格驱动开发,从 specify init 到生成实现一遍走完
Then do it again: install the specify-cli → initialization project and bind your AI agent to write the specification → according to the seven-step command flow, disassemble the task → so that the agent is generated and implemented according to the specification, and do not go astray throughout the process.
跟着做一遍:安装 specify-cli → 初始化项目并绑定你的 AI 智能体 → 按七步命令流写规格、拆任务 → 让智能体按规格生成实现,全程不跑偏。

Step 1: Install specify-cli第一步:安装 specify-cli
Fastest way: Installed uv direct execution uv tool install specify-cli --from git + https://github.com/github/spec-kit.git @ v1.2.1.
For Python users without uv, download the official PyPI sdist package of this article and perform pip install specify-cli-1.2.1.tar.gz offline installation.
After installation, execute specify --version to confirm output 1.2.1, indicating that the link is up.
最快方式:已装 uv 的直接执行 uv tool install specify-cli --from git+https://github.com/github/spec-kit.git@v1.2.1。
没有 uv 的 Python 用户,下载本文的 PyPI 官方 sdist 包,执行 pip install specify-cli-1.2.1.tar.gz 离线安装。
装完执行 specify --version 确认输出 1.2.1,说明链路已通。
Step 2: Initialize the project and bind the agent第二步:初始化项目并绑定智能体
Specify init project name in the project directory. The tool will list the supported agents such as Claude Code, Codex, Gemini CLI, Cursor, etc., and choose the one you commonly use.
Initialization generates a .specify directory (with specifications and templates) and a slash command file specific to the agent.
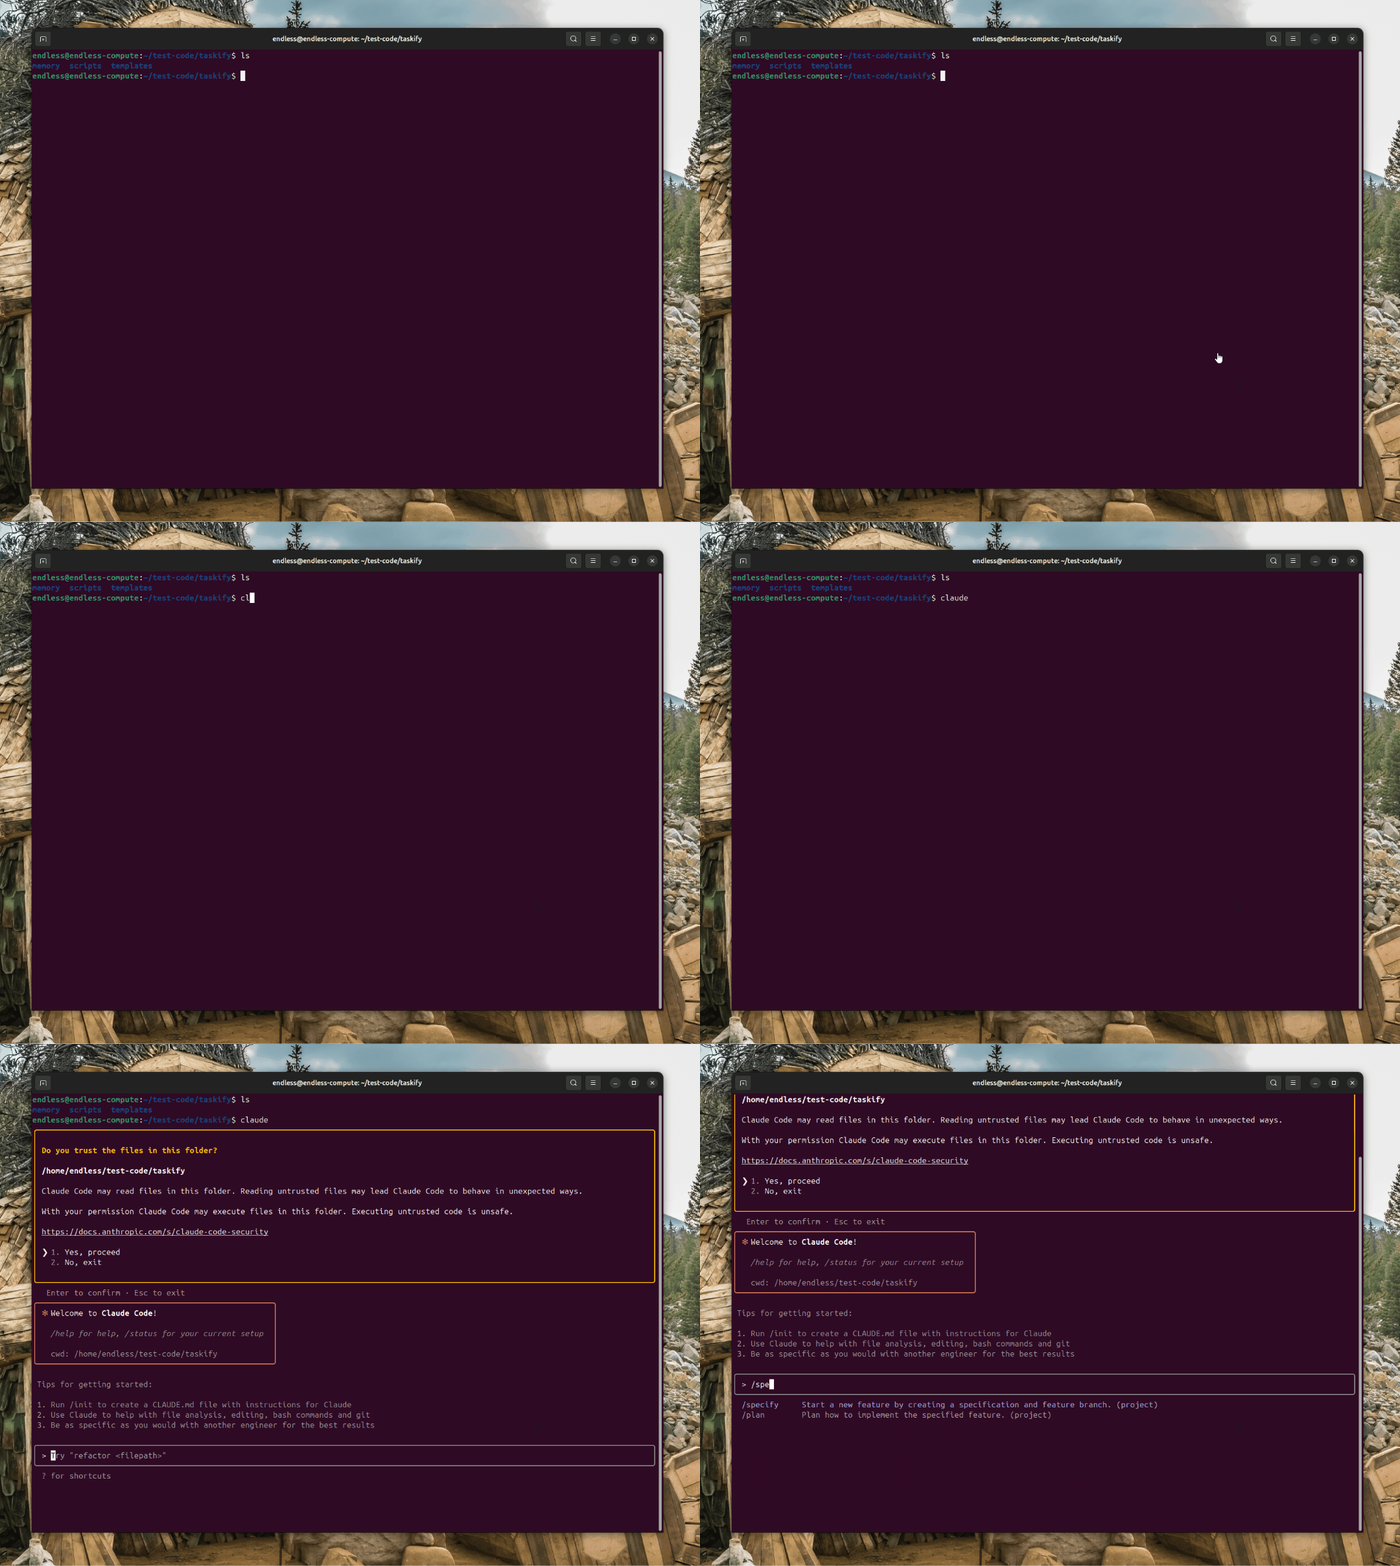
Open the AI agent, confirm that it can recognize the command at the beginning of the/speckit, and restart the session to reload the command if it cannot be recognized.
在项目目录执行 specify init 项目名,工具会列出 Claude Code、Codex、Gemini CLI、Cursor 等支持的智能体,选择你常用的那个。
初始化会生成 .specify 目录(放规格与模板)和该智能体专属的斜杠命令文件。
打开 AI 智能体,确认它能识别 /speckit 开头的命令,识别不到就重启会话让它重新加载命令。
Step 3: Follow the seven-step command flow第三步:按七步命令流推进
/speckit.constitution first writes project-level principles (technology stack, coding specifications, forbidden zones), then is bound by it at every step.
/speckit.specify describes the function to be done in natural language; immediately after writing/speckit.clarify, it will proactively ask you questions to disambiguate, this step is most worth your time.
Next,/speckit.plan defines the technical scheme,/speckit.tasks breaks down the task list with dependencies,/speckit.analyze does a consistency check, and finally/speckit.implement lets the agent implement and test itself one by one according to the task list.
先 /speckit.constitution 写项目级原则(技术栈、编码规范、禁区),之后每一步都会受它约束。
/speckit.specify 用自然语言描述要做的功能;写完立即 /speckit.clarify,它会主动向你提问消除歧义,这一步最值得花时间。
接着 /speckit.plan 定技术方案、/speckit.tasks 拆成带依赖的任务清单、/speckit.analyze 做一致性检查,最后 /speckit.implement 让智能体按任务清单逐个实现并自测。
Step 4: Acceptance and Iteration第四步:验收与迭代
After the implementation is completed, the specifications in the specs catalog will be checked and accepted one by one. The specifications are the acceptance criteria, do not rely on feelings.
When the requirements change, go back to/speckit.specify to modify the specifications and rerun the subsequent commands to keep the document and code in sync.
Submitting the .specify directory to git for team collaboration, specification review and code review become a fixed process, which is the real value of Spec Kit.
实现完成后对照 specs 目录里的规格逐条验收,规格就是验收标准,不要凭感觉。
需求变更时回到 /speckit.specify 修改规格再重跑后续命令,让文档与代码始终同步。
团队协作时把 .specify 目录提交进 git,规格评审和代码评审一样成为固定流程,这是 Spec Kit 真正的价值所在。
Use reminder使用提醒
This article is compiled from public sources and ships with the matching resource. Product features and pricing are subject to the official page. Resources are for learning and exchange only — please respect the original license.
本文整理自公开资料并附上配套资源;涉及产品的功能与价格以官方页面为准。资源仅供学习交流,请遵循来源许可。
想马上用起来?去「AI工具」栏挑一个直接下载,或在「AI教程」里跟着图文步骤做一遍。
去 AI工具 → 看 AI教程 →阅读与点赞数据保存在你的浏览器本地,欢迎留下你的想法。
 今日正能量学一点,用一点;今天种下的种子,会长成明天的能力。去免费下载专区 →广告
评论 文明发言,让讨论更有价值